The Ai Sorter photographs every flower on the belt, decides what it is, and uses air jets to send it to the stream you chose. This guide covers running it from the operator panel, setting what it accepts, and fixing common problems.
Written for back-end version 225 or later. Your version is shown in the status bar at the bottom of the panel.
Press the emergency stop if the machine moves unexpectedly or anything looks unsafe. It is the red button beside the touchscreen.
The belt starts moving as soon as you confirm the start prompt. Check that the belt and the area around it are clear first.
Air jets fire without warning while the sorter is running. Keep hands, sleeves and tools away from the sorting section and the output conveyors.
Set Conveyor Control to Off before you reach onto the belt.
Release the air pressure and follow your site's lockout procedure before cleaning or servicing.
The machine
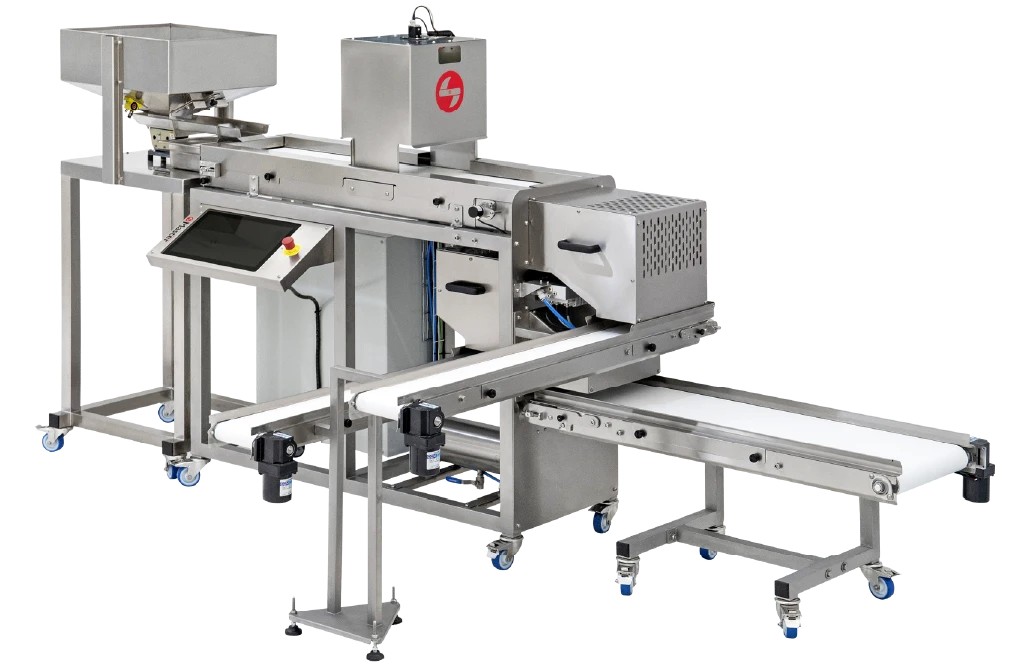
Product travels from left to right in this photo. It is loaded into the hopper, fed onto the belt, passes under the camera hood, and is sorted by air jets as it leaves the end of the belt.
123456789
The sorter from the operator's side. Tap any picture in this guide to enlarge it.
Hopper and feeder. Product is loaded here and fed onto the belt.
Belt. It carries product under the camera in a single layer.
Camera hood. The camera and its lights are inside. Keep the opening clear.
Touchscreen. The operator panel described in this guide.
Emergency stop. The red button beside the touchscreen.
Sorting section. The air jets are under this cover, at the end of the belt.
Output conveyors. They carry the sorted streams away from the machine.
Air tank and regulators. The regulators set the pressure for the jets.
Electrical cabinet. Keep it closed. It is for technicians only.
The same machine seen from the infeed end.
How it sorts
Flowers ride the belt under the camera in a single layer. The software outlines each flower and measures leaf, stem, bud rot, mold, color and size. You control two things.
Thresholds set how strict each check is.
Stream contents set where each kind of flower goes.
There are three output streams. Stream 1 and Stream 2 are filled by air jets. Stream 3 gets every flower that no jet fires at.
One belt, three streams. The red × and orange + are the same marks you see on the live image. The drawing shows the decision, not the exact position of the hardware.
What the camera seesSix flowers on the belt.What the sorter decidesEach flower gets a box and a label.
The operator panel
This is the Live View screen. The numbers match the list below.
The Live View screen with an empty belt.
Live View is the main screen. Use it to start runs and watch the live picture.
History steps back through saved pictures.
Statistics shows counts and reject reasons for the batch.
Recipe saves and loads a set of thresholds for a strain or product.
Bin Contents sets what each stream collects.
Start Sorter begins sorting once the belt is running. Press it again to stop sorting.
Calibration Mode is for teaching the sorter. Keep it OFF during production.
Refresh Feed reloads the live picture if it stalls.
Raw Stream shows the plain camera picture. Use it to check lighting and focus.
Status strip. PLC, front-end and back-end status, the back-end version, and frame-rate health.
Also on this screen
Thresholds, at the top of the side bar, opens the settings that decide what fails.
Conveyor Control has two buttons, Off and On, for the belt.
The yellow readout line at the top left of the picture shows the time, the algorithm number and the leaf and stem thresholds in use.
The slider under the picture sets how see-through the color fill is. 0 is solid color and 100 is no fill.
Settings holds machine settings for technicians. The icons beside it save images to USB, upload, switch user, manage users, lock the screen, restart the panel computer and set up Wi-Fi.
Reading the live image
Each flower gets a box and a label. The label tells you what the sorter found.
A real frame. Four flowers are GOOD and carry no mark, so they go to Stream 3. The flower labelled Leaf has orange + marks for Stream 2. The flower labelled BudRot has red × marks for Stream 1.
The labels
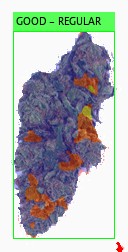
GOOD - REGULAR
No faults found. Regular size.
GOOD - SMALL
No faults found. Smaller than the size threshold.
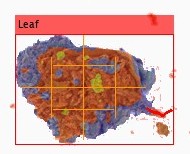
Leaf
Too much leaf showing.
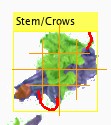
Stem/Crows
Too much stem, or a crow's foot.
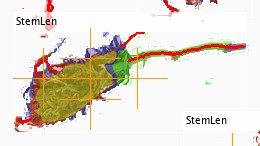
StemLen
A stem longer than the stem length threshold.
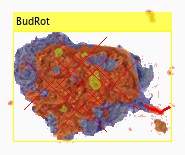
BudRot
Bud rot at or above the threshold.
No example picture
Mold/Mildew
Mold or mildew at or above the threshold.
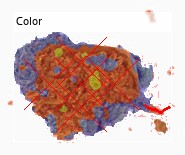
Color
Browner than the color threshold. Shown only when color sorting is on.
The color fill
The fill painted over each flower shows what the sorter sees on its surface.
Blue is flower.
Red is leaf. Thin red lines trace stems.
Green is stem.
Yellow is bud rot.
Cyan is mold or mildew.
Marks on the flower
×
A jet will send this flower to Stream 1.
+
A jet will send this flower to Stream 2.
No mark
No jet fires. The flower goes to Stream 3.
When a flower has more than one fault
A flower can show more than one label. It is sent by the first fault in this order.
A flower with both bud rot and too much leaf is sent as bud rot.
How-to guides
Button names are written the way they appear on the panel.
Start and stop a run
The run at a glance. The belt always starts before sorting and stops after it.
Pre-start check
0 of 6 done
Ticks are remembered on this device only.
To start
Set Conveyor Control to On and confirm the prompt Are you sure? Conveyor will begin moving. Check that the belt runs at a steady speed.
Press Start Sorter. The panel reminds you to set thresholds and bin contents. Sorting and the air jets are now active.
Press Bin Contents and check that each type is going to the stream you expect.
Look at the status strip. Actual Frame-rate should hold steady, at about 840, and Frame-rate Health should show no warning.
The sorter judges each object it can see on its own. How you feed decides how well it can sort.
Load product into the hopper. The feeder moves it onto the belt.
Product should reach the camera in a single layer with a gap between flowers.
Keep the feed rate steady. Avoid clumps and surges.
If labels or jets start to lag, put less on the belt at once.
GoodOne layer, with gaps. Every flower gets its own box.Too crowdedTouching flowers are judged as one object, and a jet aimed at one can take its neighbor too.
Choose what goes in each stream
The sorter gives every flower a type. This screen decides which stream each type goes to.
Press Bin Contents on the side bar. The Stream Content Selection screen opens.
Find each type: Smalls (No flaws), Regulars (No flaws), Leaf, Stem / Crows and Bud Rot/Mold/Mildew. There is also a Color type if your machine sorts by color.
Tick each type under Stream 1, Stream 2 or Stream 3. A type can be in one stream only.
Press Reset to clear the screen and start again.
Check that each stream leads to the right bin before you start.
Stream 1
Smalls (No flaws)
Regulars (No flaws)
Leaf
Stem / Crows
Bud Rot/Mold/Mildew
Stream 2
Smalls (No flaws)
Regulars (No flaws)
Leaf
Stem / Crows
Bud Rot/Mold/Mildew
Stream 3
Smalls (No flaws)
Regulars (No flaws)
Leaf
Stem / Crows
Bud Rot/Mold/Mildew
A sketch of the Stream Content Selection screen, set up for a clean-up pass. Your screen may be arranged differently.
Two example setups
Type
Clean-up pass
Size split
Regulars (No flaws)
Stream 3
Stream 3
Smalls (No flaws)
Stream 3
Stream 2
Leaf, and Stem / Crows
Stream 2, back to trim
Stream 1
Bud Rot/Mold/Mildew
Stream 1, reject
Stream 1
Tip
Put your largest volume in Stream 3. No jet fires at it, so it gets the gentlest handling and uses the least air.
Adjust thresholds
A threshold is the cut-off for one check. Leaf, Stem, Bud Rot, Mold / Mildew and Color all use the same scale.
The scale runs from 0 to 10,000, where 10,000 means 100% of the flower. The three dots are the settings shown in the photos below.
Leaf Threshold 1,000Four of six fail.Leaf Threshold 4,000Two of six fail.Leaf Threshold 8,000None fail.
The same six flowers at three settings. Nothing changed but the number.
What does my number mean?
40%
A flower fails when 40% or more of its visible surface is leaf.
Press Thresholds on the side bar.
Change one number at a time, and by a small amount.
If too much good product is rejected, raise the number. If faults are getting through, lower it.
Watch the live picture. Press Refresh Feed if it does not update.
What each threshold checks
Threshold
What it checks
Scale
To reject more
Leaf
Share of the flower's surface that is leaf
0–10,000
Lower it
Stem and Crow's Foot
Share of the surface that is stem
0–10,000
Lower it
Bud Rot
Share of the surface showing bud rot
0–10,000
Lower it
Mold / Mildew
Share of the surface showing mold or mildew
0–10,000
Lower it
Color
Share of the surface that reads amber or brown. Works only when color sorting is on
0–10,000
Lower it
Stem Length
Length of the longest stem
pixels
Lower it
Size
The size where Smalls end and Regulars begin
pixels
Raise it to count more flowers as Smalls
Minimum Size
Pieces smaller than this are ignored
pixels
Not a reject setting
Tip
Settings are kept when the machine is switched off and on again. You do not need to enter them each morning.
Teach the sorter by clicking
You do not have to work out a number. Show the sorter flowers you would keep and flowers you would reject, and it sets the threshold for you. You can skip this and run on recipe settings alone.
1234567
The Calibration Labeler with three flowers marked Pass and three marked Fail.
Pass (green) marks the flowers you would keep.
Fail (red) marks the flowers you would reject.
Fail Reason. Leave it on Auto (find best), or pick the fault yourself.
Sensitivity sliders for bud rot and mold.
Clear Labels removes every label so you can start again.
Done / Export finishes and writes the new threshold.
The photo. Your labels appear on the flowers as you click.
Steps
With the belt stopped, place a mix of flowers under the camera hood. Include some you would keep and some you would reject, and keep them apart.
Press Calibration Mode so that it reads ON. The button turns red.
Wait for the question Would you like to run the calibration utility? and choose Yes. The Calibration Labeler opens with a photo of the belt.
With Pass (green) selected, click each flower you would keep.
Select Fail (red). Leave the reason on Auto (find best), or pick one: Leaf, Stem / Crows, Bud Rot, Mold or Color.
Click each flower you would reject.
Press Done / Export. The new threshold is written to the panel.
Set Calibration Mode back to OFF, then run a short sample and check the labels on Live View.
How the threshold is set
The sorter measures your flowers and puts the threshold between the two groups. HIGH sensitivity sits nearer your Pass flowers, so more is rejected.
What makes it work
Label at least two Pass and two Fail flowers. Five or more of each gives a better result.
With Auto (find best), the sorter tests leaf, stem, stem length, bud rot, mold and color. It changes only the one that best separates your two groups. The other thresholds stay as they were.
If you pick the reason yourself, only that threshold changes.
Select Fail (red) with the reason Color, and click the browner flowers.
Press Done / Export. The color threshold is set and color sorting is switched on.
Press Bin Contents and choose the stream for the Color type.
To stop sorting by color, switch color sorting Off on the Thresholds screen.
Color sorting on. The brownest flower is labelled Color and marked for Stream 1. The other five pass.
Good to know
Color sorting always picks out the browner group. To collect the greener flowers, send Color to the stream you want the brown ones in and let the green ones continue.
Teach color again after any change to the lights, and for each new strain. Purple and dark strains need their own teaching.
Bud rot and mold are decided before color. A flower with bud rot is sent as bud rot.
Save and load recipes
A recipe is a named set of thresholds. Save one for each strain or product so that changeovers take seconds.
The Recipe window. The list and Load are on the left. The name box and Save are on the right.
Save
Set the thresholds the way you want them.
Press Recipe on the top bar.
Check that the fields show the values you want to keep.
Check the name. Type a new name if this should be a new recipe.
Press Save.
Load
Press Recipe on the top bar.
Choose the recipe from the list.
Press Load and confirm the prompt that asks to overwrite the current settings.
Notice
Saving under a name that already exists replaces that recipe. To keep the old one, type a new name first.
A recipe does not set stream contents. Check Bin Contents, and color sorting if you use it, after you load a recipe.
Algorithm Select is set for your product when the machine is installed. Do not change it unless support asks you to.
Change strain or batch
Let the belt run empty. Press Start Sorter to stop sorting, then set Conveyor Control to Off.
Empty and swap the bin for each stream.
Save the images and note the statistics if you need them. See Review a run.
Press Reset Counts on the Statistics screen and set the new batch name.
Load the recipe for the new strain. You can also save a copy under a new name and adjust it.
If you sort by color, teach color again for the new strain.
Check Bin Contents, run a short sample, and check that the labels make sense.
Review a run
Statistics
Press Statistics on the top bar.
The Statistics screen after a morning's run.
The trend chart at the top shows each count over time. Tick or untick a pen to show or hide its line.
Rejection by Cause shows Stem Length, Leaf, Mold / Mildew and Bud Rot rejections for the batch.
Counts by Size shows Smalls and Regulars.
Reset Counts zeroes the counters for a new batch. Print Stats prints the screen.
History
Press History on the top bar to step back through saved pictures. Switch between Raw Stream and Segmented Stream to compare the plain picture with the labelled one. Use this to check a decision you were not sure about.
Save images to USB
Plug a USB drive into the panel computer.
Press the save icon on the top bar.
Wait for the message Data copied, you may remove the USB drive.
Troubleshooting
Find what you see on the left. The cause and the fix are on the right.
Every flower gets the same fault label
The threshold for that fault is set too low, so almost anything fails it.
Press Thresholds and raise the number for that fault. A higher number is more tolerant.
Set it to 10,000 to switch the check off while you investigate.
Check that the right recipe is loaded.
If it still happens at 10,000, note the Back-end Version and contact support.
Leaf Threshold set to 5 by mistake. Every flower fails. The yellow readout line shows the number.
Nothing is being rejected
Sorting has not been started, the checks are switched off, or every type is assigned to Stream 3.
Check that you pressed Start Sorter after the belt started.
Press Thresholds. A value of 10,000 means the check is off. Lower it.
Press Bin Contents. Move the types you want removed to Stream 1 or Stream 2.
For color, check that color sorting is switched On.
Flowers are labelled as faults but stay on the belt
That type is assigned to Stream 3, or the jets have too little air.
The air jets are weak
The supply pressure is low, there is a leak, or flower is blocking the nozzles.
Check the pressure at the regulators. Turn the large blue knob clockwise to raise it.
Check the filters for water and listen for leaks.
With the machine stopped and the air released, check the nozzles for flower and clear them. They are in the sorting section at the end of the belt.
12
1 is the air tank. 2 marks the regulators, each with a blue knob on top.
Good flowers end up in a reject stream
A threshold is too strict for this strain, or Smalls share a stream with rejects.
Read the label on the flowers that are wrongly sent. That tells you which threshold to raise.
Raise that number a little, or teach the sorter with examples from this strain.
Check on Bin Contents that Smalls and Regulars are in the streams you expect.
Jets fire late, miss, or hit the flower next to it
There is too much on the belt for the sorter to keep up, flowers are too close together, or the jet timing has drifted.
Check Frame-rate Health on the status strip.
Put less flower or trim in front of the camera at once, and leave more space between flowers.
If single, well-spaced flowers are still missed, call a technician. Jet timing and lane calibration are set under Settings.
Boxes overlap, or two flowers share one box
The flowers are touching, so the camera cannot tell them apart.
Spread the product at the infeed so that flowers arrive in a single layer with gaps.
Slow the rate you feed at if the belt looks crowded.
A crowded belt. The labels overlap and are hard to read, and touching flowers are judged together.
Small pieces get no box
They are smaller than the Minimum Size setting, so the sorter ignores them. This is normal for crumbs and shake.
Ignored pieces go to Stream 3 with everything else that is not blown.
If small material matters, screen it out before the sorter.
The picture is frozen or blank
The panel has stopped receiving new pictures, or the vision software has stopped.
Press Refresh Feed first.
Watch the time in the yellow readout line. It should advance.
If it does not, press Restart Backend and wait. The panel shows Initializing System... Please wait this will take some time.
Your thresholds and stream contents are kept through a restart.
The picture is dark
The lights inside the camera hood are off.
Press Raw Stream to see the plain camera picture.
If it is dark, ask a technician to switch the lights on under Settings, Light Control.
Teach color again once the lighting is back to normal, if you sort by color.
The panel warns about faults when you start
A setup mode is still on. Most often it is Calibration Mode or Simulation. Sorting in a setup mode gives unreliable results.
Cancel the start prompt.
Press Live View. This switches the setup modes off.
Check that the side bar reads Calibration Mode: OFF, then start again.
If a fault count still shows, call a technician.
PLC Status does not read Connected
The panel has lost contact with the machine controller. The jets and the belt cannot be controlled.
Do not run product.
Check that the machine is powered on and has had 3 minutes to start up.
If the status does not return to Connected, call a technician.
Color results have drifted
Color is judged from the camera picture, so it changes when the light changes. It also differs between strains.
Teach color again with examples from the product you are running now.
Teach it again after any lamp change or lighting adjustment.
Teaching did not change anything
The sorter could not find a clear line between your Pass and Fail flowers.
Label at least two Pass and two Fail flowers. More is better.
Choose examples that are clearly different. Leave out borderline flowers.
Use Auto (find best) if you are not sure which reason applies.
For Color, the Fail flowers must be the browner group.
Frame-rate Health shows a warning while running
Pictures are not arriving at the expected rate. Labels and jets may lag behind the belt.
Put less product in front of the camera at once.
If the warning stays, stop the belt and press Restart Backend.
If it returns, note the Actual Frame-rate and contact support.
Technician settings
The Settings window holds values that were set when the machine was installed. Changing them can make the jets miss or the camera lose timing. Leave them alone unless a technician asks you to change one.
The Settings window. These values belong to the machine, not to a strain.